Tuesday, 19 November 2013
New feet
Yay. The postie bought me a bag of shiny new feet this morning. So not only have BigDug sent me the 16 feet I was missing for free, they've done it in less than 24 hours too! I shall be off outside later to get the rest of my shelving sorted I think.
Monday, 18 November 2013
Finished floor and new shelving
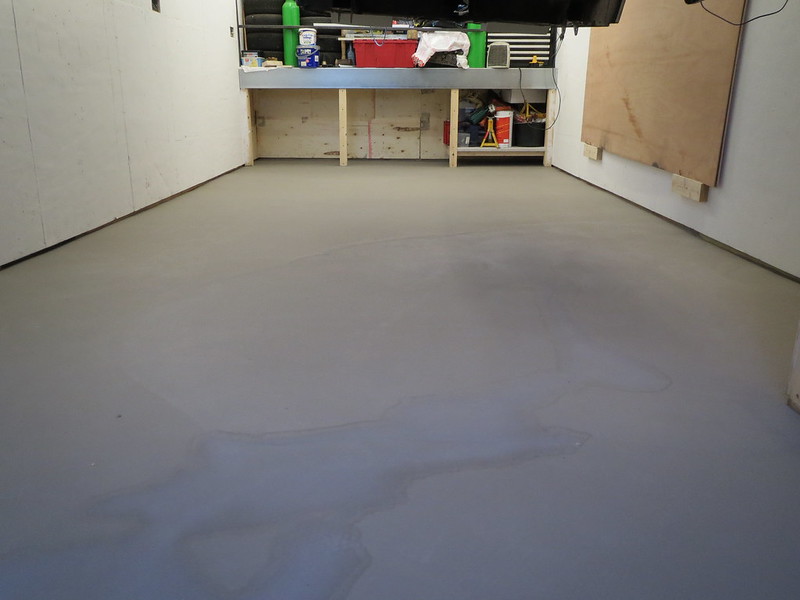
Well the second coat of paint is done and dried. And I'm quite pleased with how it's gone. It did take while to go off as I only have a small fan heater in there at present, and it needs at least 24 hours at 20C. The only thing that could be better is that due to having put it on a touch thick, well at least 50% thicker than expected, there are a few roller marks that have been left. But having been walking about in there for a few days, I no longer notice them so it can't be too bad!
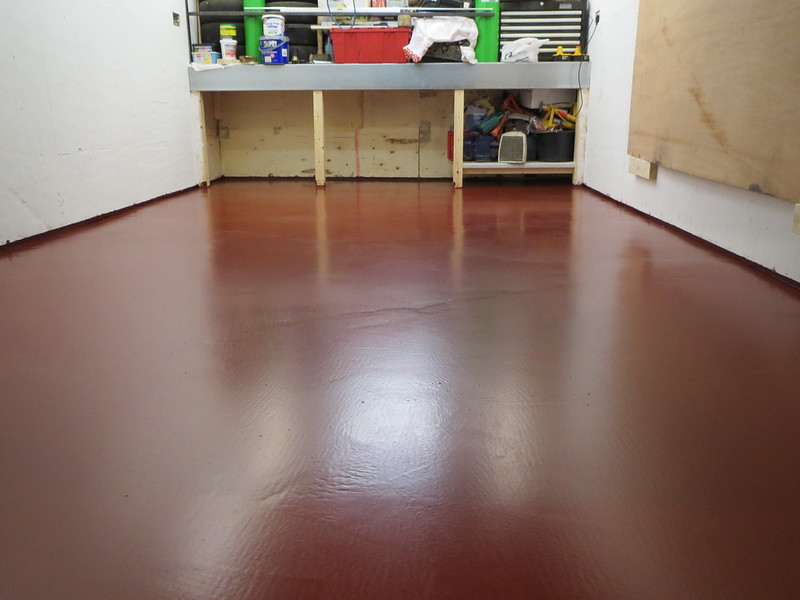
And now the floor has dried I can make a start on clearing the loft and sorting out all my stuff. And it's not going to be a particularly quick task I suspect! But one thing that should help is an Ebay purchase from a few months back. I managed to acquire 5 sets of Big Dug shelving for £95, so they'll be going up along the wall next to the side door. They'd all be up already, but I realised I'd only got one set of feet for them. Not sure what happened to the rest, but I don't have them. So I rang Big Dug this morning to get a price for 16 feet only for the nice man to say that they'd be sending them to me for free as a good will gesture. I think this is amazing service, as although the bits probably don't even cost a few pennies to make, sending them to me takes time and effort. And the shelves seem nice and solid once I've screwed them to the wall too, so all round a good job!
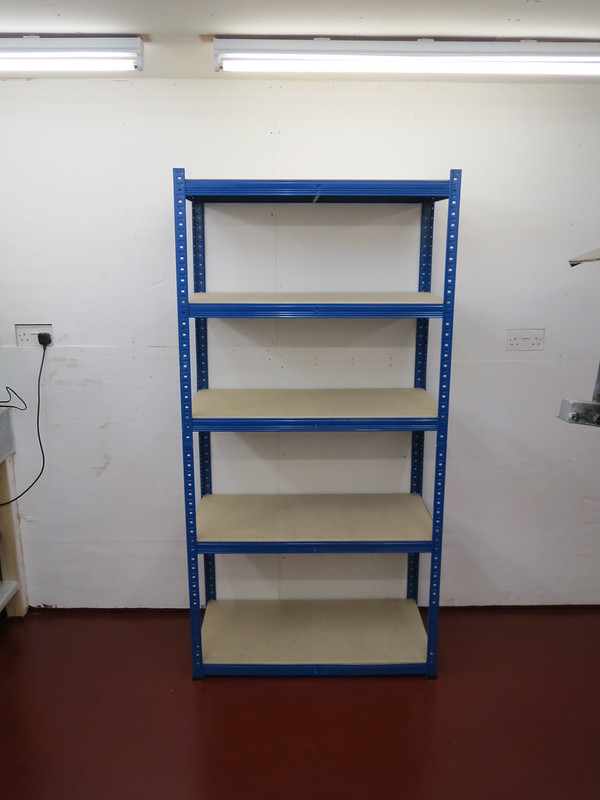
And now the floor has dried I can make a start on clearing the loft and sorting out all my stuff. And it's not going to be a particularly quick task I suspect! But one thing that should help is an Ebay purchase from a few months back. I managed to acquire 5 sets of Big Dug shelving for £95, so they'll be going up along the wall next to the side door. They'd all be up already, but I realised I'd only got one set of feet for them. Not sure what happened to the rest, but I don't have them. So I rang Big Dug this morning to get a price for 16 feet only for the nice man to say that they'd be sending them to me for free as a good will gesture. I think this is amazing service, as although the bits probably don't even cost a few pennies to make, sending them to me takes time and effort. And the shelves seem nice and solid once I've screwed them to the wall too, so all round a good job!
Monday, 11 November 2013
More painting, less watching it dry
Since I'm currently on call at work, this Saturday was spent driving round fixing stuff. But since Sunday was quiet, I did manage to get the second coat of floor paint down. Whilst I did a better job of evening it out over the entire floor, it did mean putting it on thick all over. And although I don't have any pics yet, I'm not sure all the roller marks are going to disappear. But I am sure it's water proofed the floor as I've had to leave the garage door up a touch so the paint doesn't stick it down. This then lest the rain in, but it just pools on the surface, just as I had hoped. I'll grab a photo or two once it's dry enough for me to walk about on. And once it is that dry, I can finally get my shelving set up and start organising everything.
Oh, and if anyone wants to donate either a Record 74 or 75 vice that would be great, as the second one I got from Ebay was bent and wouldn't shut.
Oh, and if anyone wants to donate either a Record 74 or 75 vice that would be great, as the second one I got from Ebay was bent and wouldn't shut.
Wednesday, 6 November 2013
Painting. And then watching it dry.
Since I have only heard horror stories of cheap floor paint in workshops, I spent a while looking at the proper epoxy floor paints that have a more industrial purpose. And I found one that Watco sell that is suitable for my needs. It's also normally £110 + VAT and delivery! Thankfully, they seem to be selling off their stocks of it, so £40 got me a 4.5 litre tin of the stuff. Well it's two tins that make 4.5 litres, but you get the idea.
And it turns out like this.
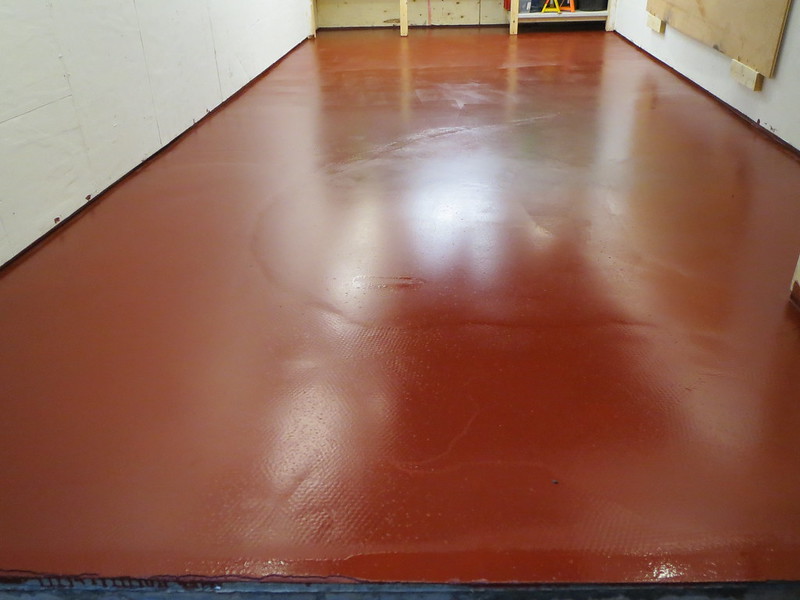
Which I'm quite happy with, as I didn't know it would be shiny. It's still drying in the photo, as it takes 24 hours at 20C to dry, and it's not that warm here. This was taken after about 20 hours, so it might be dry by this time tomorrow.
The only real issue I have had with it is that 4.5 litres is good for up to 30 square meters of floor. And once you get to the end of a 21 square meter floor, you feel bad about throwing expensive paint away. Or you end up pouring the remaining paint on the floor and just putting it on a bit thickly instead. How good an idea this is remains to be seen!
The only other issue with a shiny floor is that I can now see all the little imperfections where the floor's not flat. But since most are where the shell will sit, I won't have to see them so I won't mind!
And it turns out like this.
Which I'm quite happy with, as I didn't know it would be shiny. It's still drying in the photo, as it takes 24 hours at 20C to dry, and it's not that warm here. This was taken after about 20 hours, so it might be dry by this time tomorrow.
The only real issue I have had with it is that 4.5 litres is good for up to 30 square meters of floor. And once you get to the end of a 21 square meter floor, you feel bad about throwing expensive paint away. Or you end up pouring the remaining paint on the floor and just putting it on a bit thickly instead. How good an idea this is remains to be seen!
The only other issue with a shiny floor is that I can now see all the little imperfections where the floor's not flat. But since most are where the shell will sit, I won't have to see them so I won't mind!
Tuesday, 5 November 2013
Progress?
What I have managed to do in the mean time though has been worth the effort. After much waiting and having to do other things, I've managed to get the last coat of self-levelling compound down!
This wouldn't have been necessary if the concrete slab had been flat and smooth in the first place. But it was no where near. That's the problem with using a friend of a friend set up. If things don't go to plan, you're a bit stumped for any come back. Next time, if/when there's a next time, I'll be getting it done properly by someone else. It'll be much quicker and probably cheaper too. Either way, the slab was wonky and needed levelling. Most of this has been done, but a final coat is required. To do this, the floor must be clear. And that means moving the shell. But it's November and the weather's rubbish. And as much as just putting on the drive is the easy option, it also leaves it exposed, which is something I really want to avoid if at all possible.
And thankfully, it is possible to avoid:
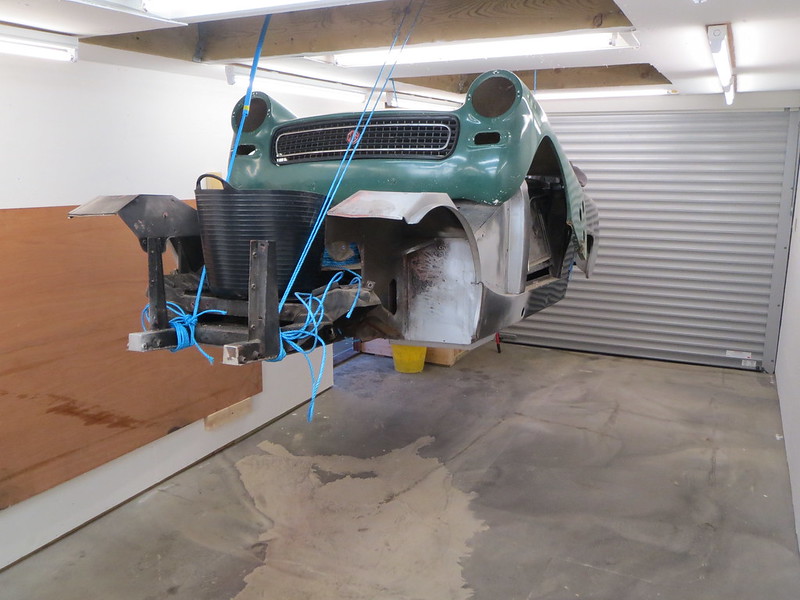
Now, I'm not 100% sure what Mr HSE would have to say about this set up, but I can imagine it's full of expletives! But since I'm happy with it, and it's my private garage, I don't much care what Mr HSE would say.
So with the shell in the air, my work bench sheeted up on the drive and some other bits in The Boss's shed, I could make a start. I'm using Instarmac's product HD Top for the floor for no reason other than their technical and sales team, Lisa in particular, have been amazing to deal with, despite me being a private customer and not the large companies they usually deal with. The other reason is I know all the stuff is designed to work together so it shouldn't go wrong. Well, as long as you don't over water the stuff and then have it go soft as well as uneven on the floor. But we'll chalk that up to experience and not do it again!
The first thing to do is to prime the floor. This bit's easy as the smallest tub of acrylic gunk is good for at least 133 square metres of floor and I've only got 21. You just mix it as instructed, bung it on the floor and push it about with a brush and a roller. Wait for it to dry and go clear and then repeat. Simples.
The hard bit, especially when working on your own as it turns out, is the levelling compound. The bit that's hard is mixing it quickly enough to get a bucket of it poured and trowelled before the previous stuff is starting to go hard. Because it has a short pot life you need to keep a wet flowing edge to the stuff so the buckets can mix on the floor as you go. But once each bucket is poured you need to go over it with a spiked roller to pull all the air bubbles out before you can mix the next batch. All of which takes precious time. Overall, I'm quite pleased with how the stuff went down but there are one or two spots which could've been better as I can be a bit of a perfectionist at times.
So this is what it looks like now that I've rubbed the high spots off. It's nice and smooth and ready for painting which I hope to do later today.
The staining in the bottom of the photo was from the rain we had overnight. The dam keeping the compound in also kept the rain in. But the only effect it has is to discolour the surface. And since it's being painted tile red, it won't matter.
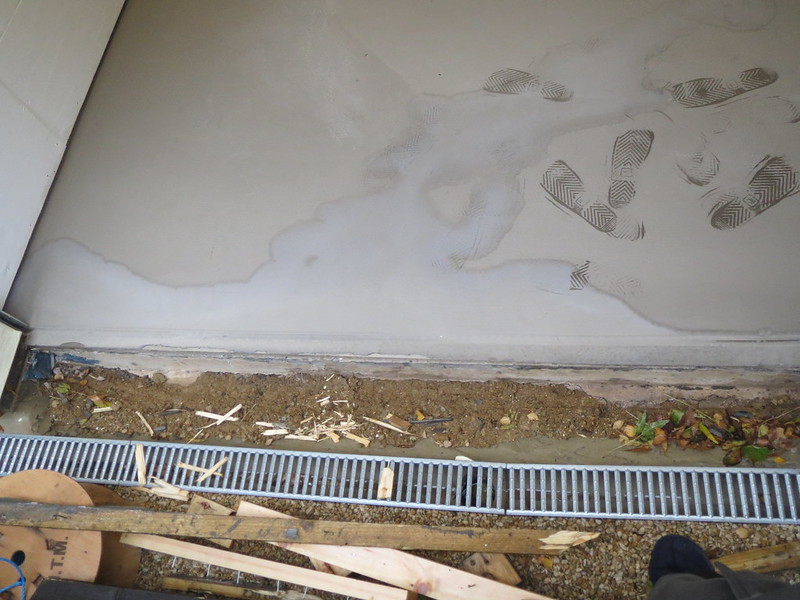
The only other thing I've done is to remove the boarding from across the front edge now it's all dry. I had hoped it wouldn't crack the leading edge, but it has a little. To cover this, I'm going to go with a suggestion from The Boss, which is to put a stainless steel angle piece across the leading edge once it's been painted. I'm going to cut the floor back to allow me to fit the angle flush to floor so I can still sweep the floor easily.
Monday, 21 October 2013
Now for a quick update on my most recent thing in the workshop. I'm only doing this now as I'm waiting for pay day to arrive so I can afford some more self levelling compound for the floor. I need to sort the floor and paint it before I can arrange the shelves. Once that's done I can clear the loft. Then I can finish the wiring. Then I can tile the corner above the sink. And then, finally, I might actually get back to the Sprite.
Maybe.
But I digress.
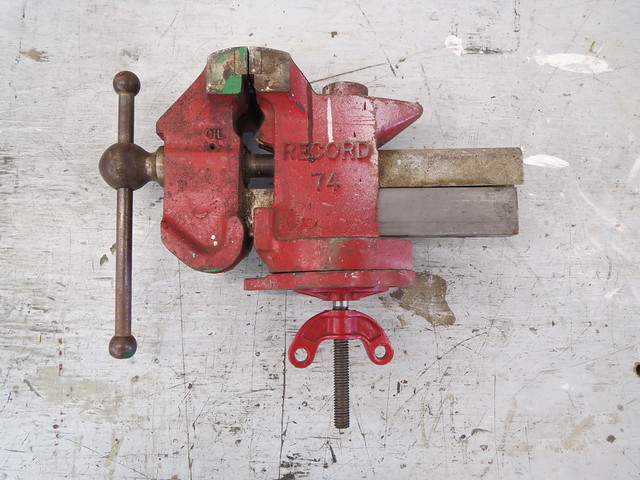
The first photo I put up was of the cleaned up static jaw body of a Record Autovice 74, or just Record 74 as the later ones have cast on them. The first I have is the later type and I have an early one on the way. Ah, Ebay to my rescue yet again.
When the vice first turned up it looked like this, not too bad but it could be better. And since I can't do much in the garage right now, I may as well take it apart and clean it.
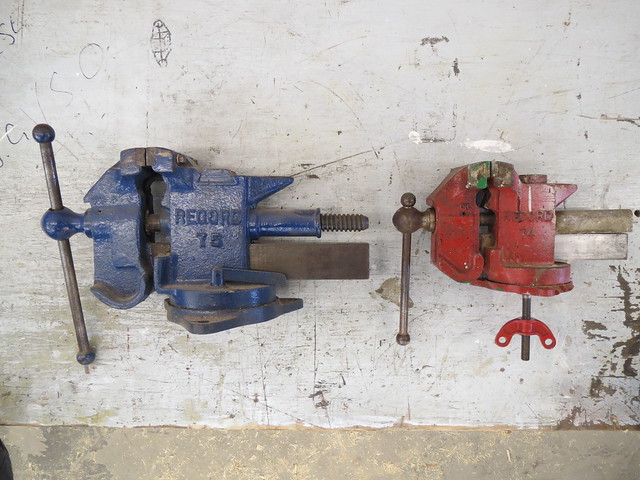
So this is the same vice broken down to its components, and then sat next to it's big brother a Record 75. Which is a big heavy lump of a vice. But bomb proof and considerably older than I am, and I'm thirty now.
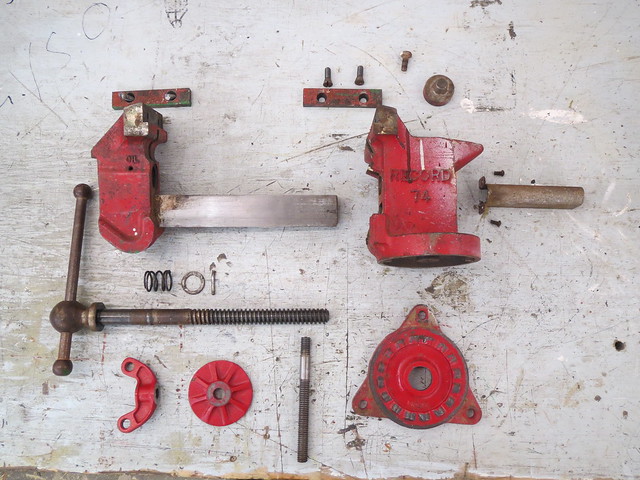
The vice is currently in bits, being cleaned back to bare castings so I can etch prime the entire thing before giving it a new coat of red enamel. There's virtually no slop on the screw thread so all I need to do is get some new jaws and their screws once it's painted and it'll be good to go. And then I get to do it all again for the second one just so I can have a matching pair on my planned workbench!
Maybe.
But I digress.
The first photo I put up was of the cleaned up static jaw body of a Record Autovice 74, or just Record 74 as the later ones have cast on them. The first I have is the later type and I have an early one on the way. Ah, Ebay to my rescue yet again.
When the vice first turned up it looked like this, not too bad but it could be better. And since I can't do much in the garage right now, I may as well take it apart and clean it.
So this is the same vice broken down to its components, and then sat next to it's big brother a Record 75. Which is a big heavy lump of a vice. But bomb proof and considerably older than I am, and I'm thirty now.
The vice is currently in bits, being cleaned back to bare castings so I can etch prime the entire thing before giving it a new coat of red enamel. There's virtually no slop on the screw thread so all I need to do is get some new jaws and their screws once it's painted and it'll be good to go. And then I get to do it all again for the second one just so I can have a matching pair on my planned workbench!
And speaking of the Sprite, here's my plans for it, what I started with, and where I'm at now.
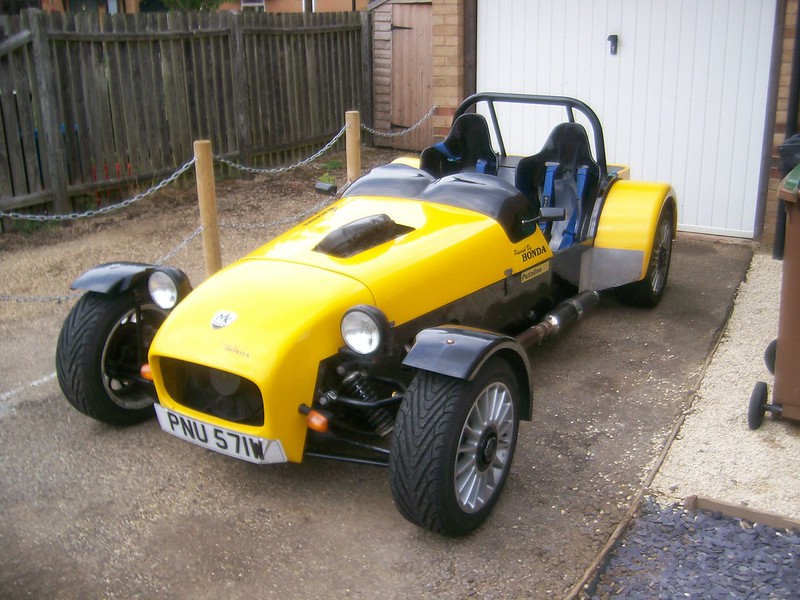
The original plan was to build a replacement for my old MK Indy 7 clone kit car. I owned this when I was married and I loved it! 500kgs, 160 BHP and an 11,000 RPM rev limit due to having a Honda Blackbird engine makes for quite an intoxicating drive.
However, with a divorce to pay for and some outstanding debts to clear, I had to sell it. Which was a real shame as I loved having my little toy car. But now she's off in the Alps hopefully having a lot of fun. So the aim of making something at least as quick but more practical came about. More practical because owning a 7 is fun, and I've done a full weekly shop and even fetched 7' tree stakes in it but having a heater and a boot would be nice so I can go touring in it and maybe even persuade my partner to come along occasionally. But not often though. She tells me off too much for that......
So the search started for ideas. I didn't have any one thing in mind as I was open to just about any sort of project, but I was leaning very quickly towards something small and light as that's how I like my toy cars. It makes them cheaper to run and look after and parts tend to last longer. They're also a more engaging drive. And they fit in garages with space to work on them too!
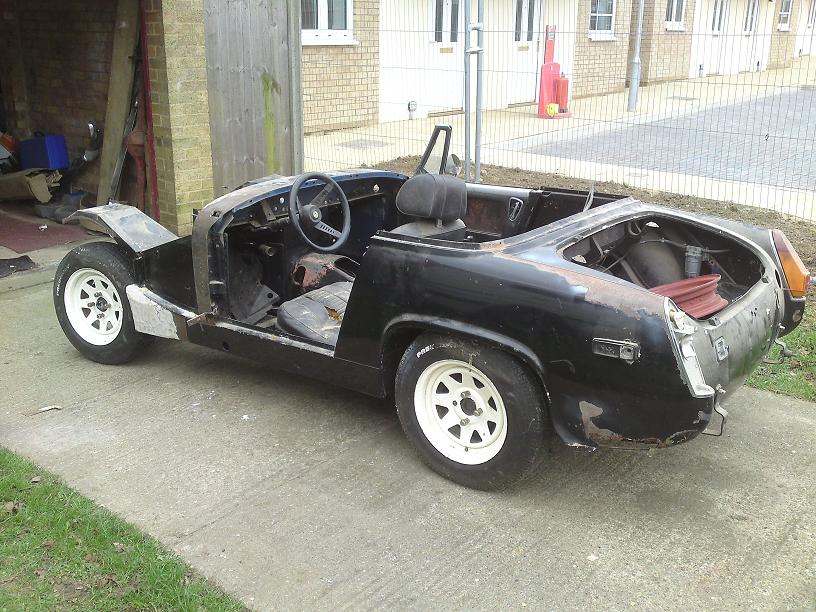
One day I got a call from my partner saying a bloke at work had been told my his Mrs to get rid of the car he'd not really been working on for the past 4 years. Following a few questions, he didn't really know much about what the car was and he thought it might be an MG Midget. Since he only wanted £100 for the car and the boxes of bits, I figured it was worth a look. Upon closer inspection, it turned out the car was an 1969 Austin Healey Sprite, not a Midget, and it was complete but had seen better days. It also isn't registered in the UK as it's a left hand drive US market car. This also means it had spent most of it's life either in garages in the UK or in Florida where it's nice and dry. Whilst I hadn't planned on a full re-build, it seemed like a good challenge so £100 soon changed hands and the car was trailered home.
Upon closer inspection, and initial strip down, there was a bit more rust than I had hoped but less than I feared. Some fool had also tried to fit some form of arch extensions to the sills on both sides by brazing on steel plates and then covering them in 1/2" of filler! But overall the shell only needed what seemed easy work and a plan was hatched to change the engine and up the power.
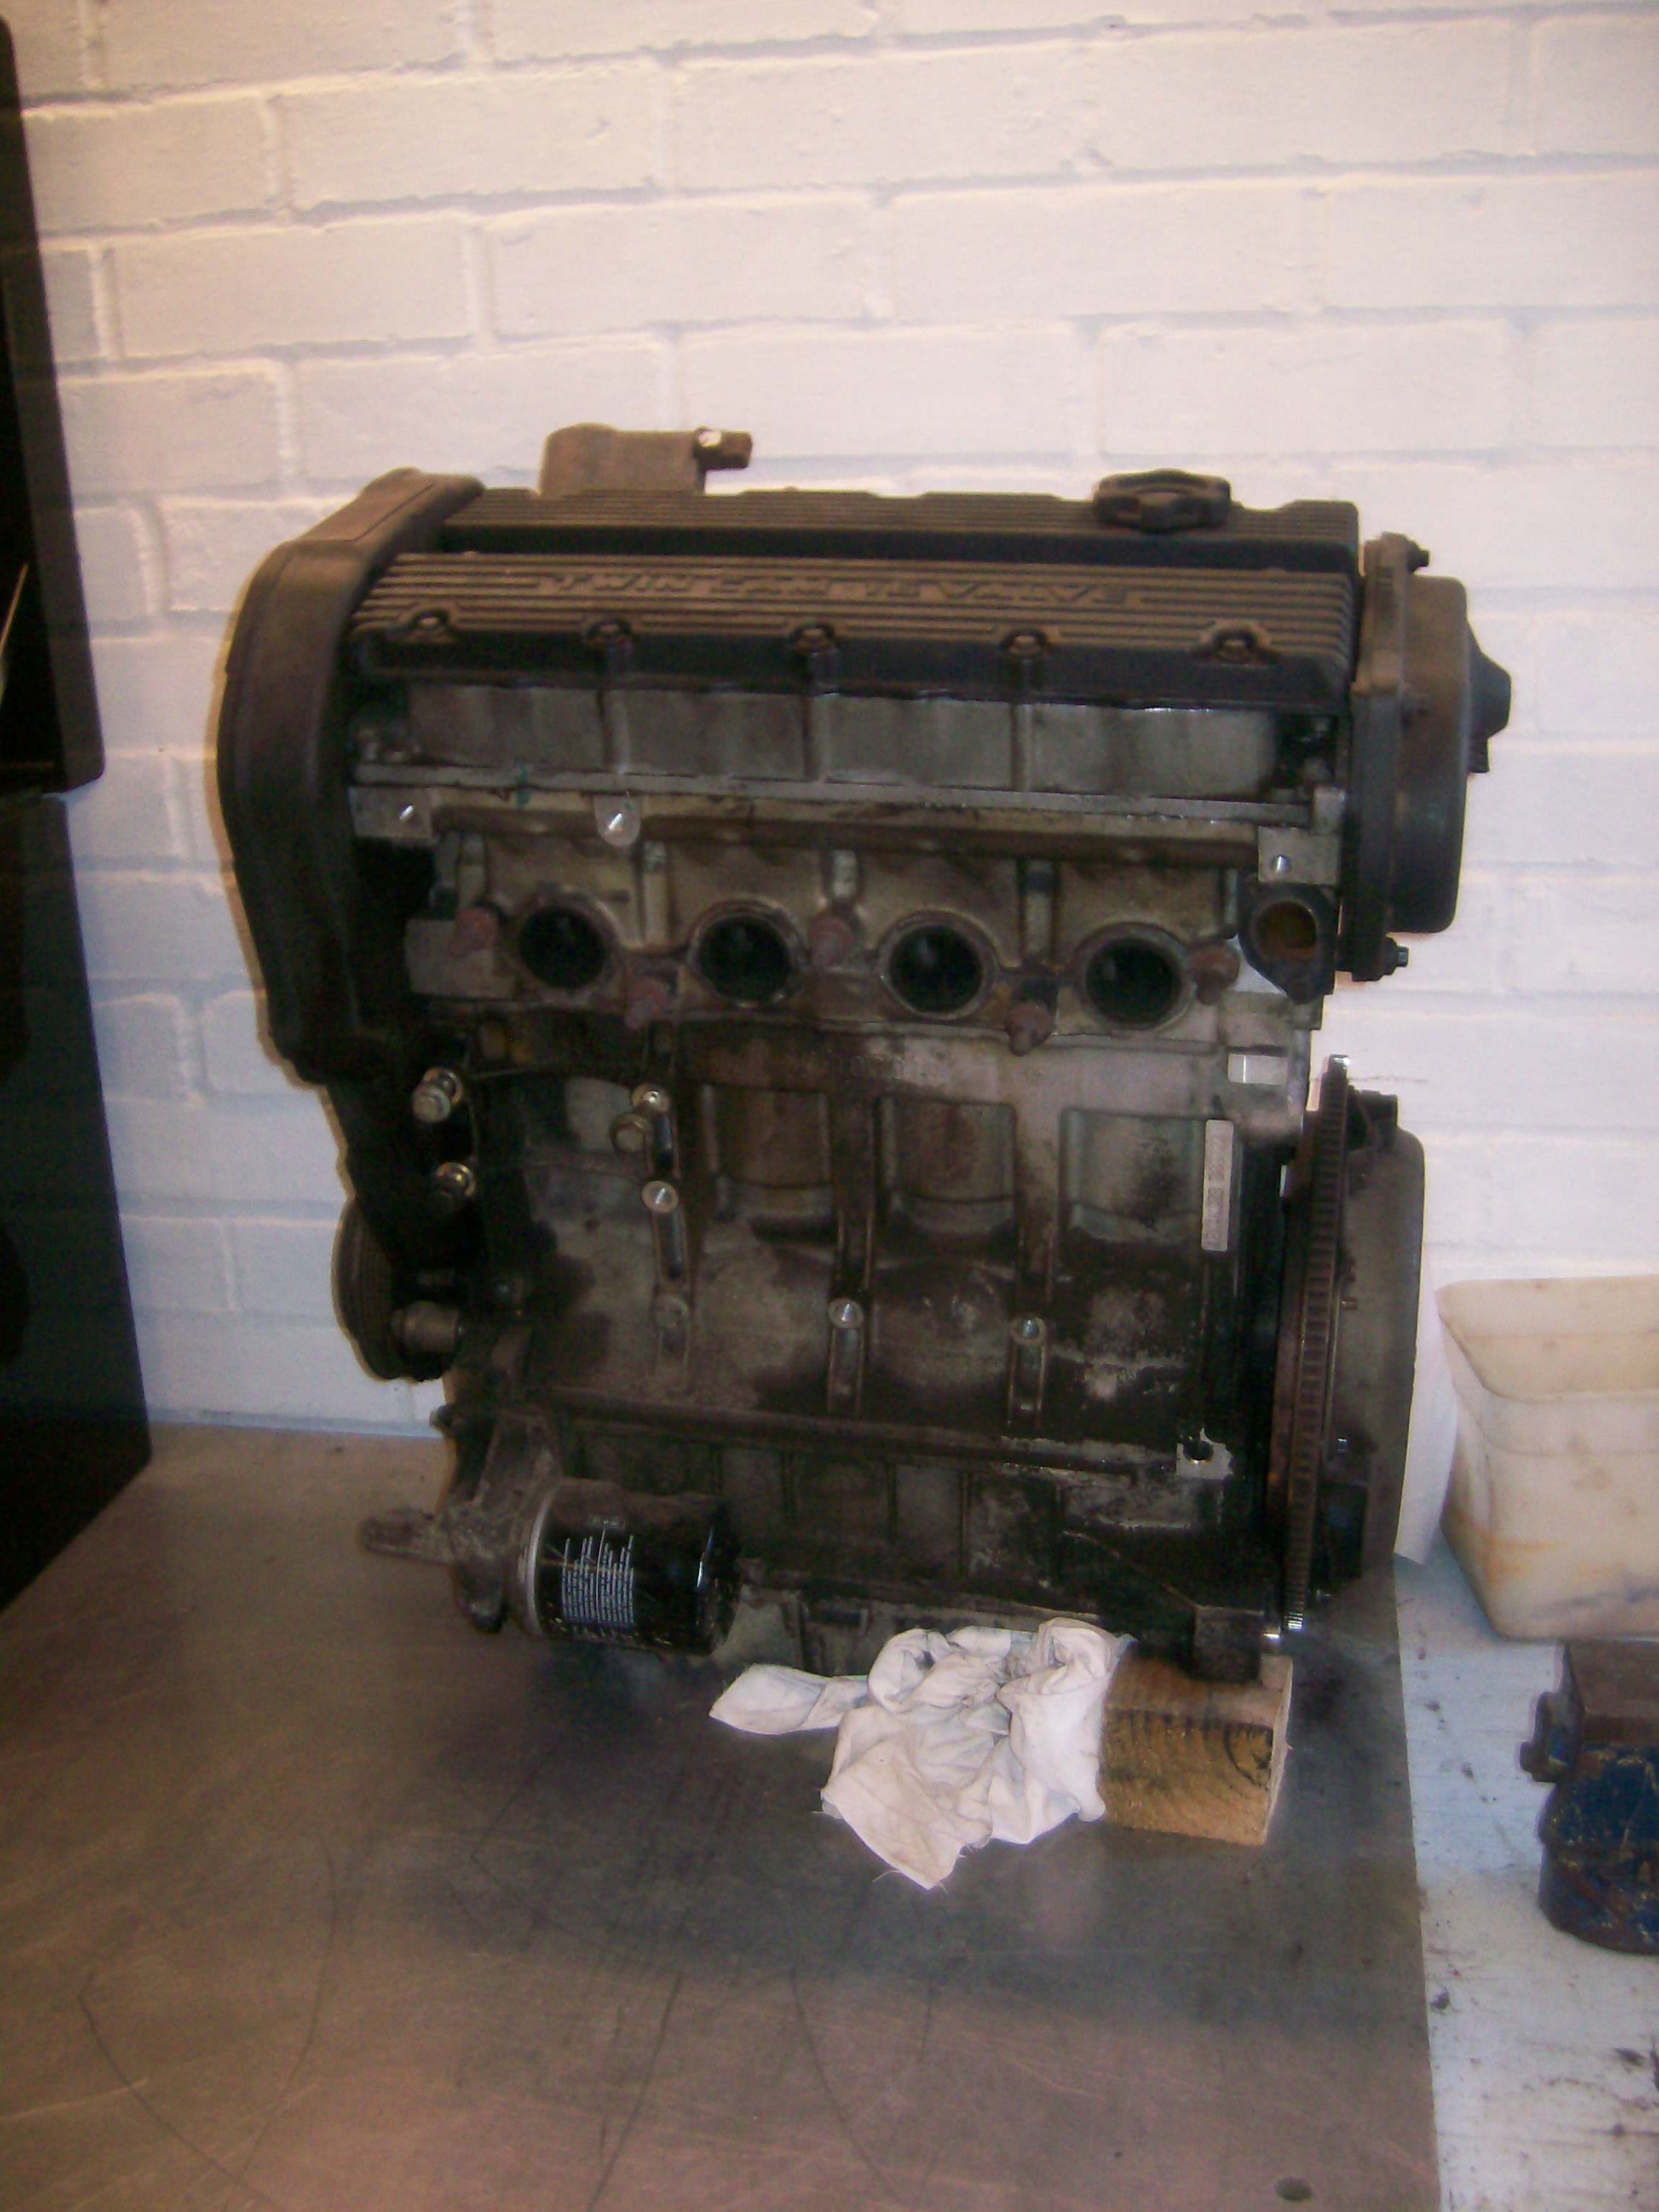
From researching what can be done to these little cars, it soon became obvious that the engine of choice is Rover's K series engine. It's a lightweight, all alloy engine that is very light and comes in 1.4, 1.6, 1.8 and 1.8VVC versions ranging from 110 bhp up to 190 bhp for Lotus's VHPD version.
So off I went to Ebay, looking for a decent 1.8 VVC engine. I even bought one along with the better alloy inlet manifold and ECU. But then I had a thought. To beat the MK Indy, I wanted more than the 300 bhp/ton that it had. And in a 750 kgs car, that means having 225 bhp. Which as it turns out is quite a bit for a usable N/A K series. It's doable, but means spending quite a bit more money than I had in mind. So the K series got sold.
So a re-think was in order. I've always wanted, but never had a V engined car. So a bit more research dug up Mazda's KL 2.5L V6. It's tiny for a V6, all alloy and 160 bhp in stock form. But with the addition of individual throttle bodies, or ITBs, it'll make 205bhp, along with a good dollop of torque. It's also a nice revvy thing, with a factory limit of 7200 rpm which can be safely raised to 8,000 rpm. Now this was starting to look more like it. With a hike in compression, easily done with JDM spec pistons, and maybe some reground cams, a nice 225bhp should be achievable. OK, it's a bit bigger than the K series, but given all the work I had planned, what was a little bit more?!

Now, when taking a 40 year old car and quadrupling the power it has, there are a few other things you need to consider. Can the shell handle it? Will the brakes stand even a bit of a chance of stopping it? Will the tiny little back axle last for more than 30 secs? Is the front suspension any good? Is this a good idea, and has anyone else done it for hints and tips?
And for the Sprite, the answer is mostly no to those questions! The shell could cope, but I decided to reinforce it anyway in several places. The brakes? Not even worth considering. So it's MGB 10.75" discs with 4 pot Wilwood callipers at the front and 9" discs at the rear. The back axle? A standard A series can snap one, so the V6 would mash it in moments. A full De-Dion set up from the back of a Caterham Superlight should do the trick though. The front suspension? Dubious at best and needs greasing more than I want so it's going to be replaced with a double A arm coil over set up. It might have inboard coil overs to aid with packaging and ride height adjustments, but that's not for definite yet. As for it being a good idea, yes it is. No-one else I know of has done this to a Sprite before but I do know of one other chap fitting the same V6 as he's been asking me for advice. So at least one person thinks I know what I'm doing!!
So that's the plan, but where am I now? Well the shell's pretty much done. There's some minor work to do on the front suspension mountings and I have to re-build the transmission tunnel to fit the MX-5 gearbox I'm using but that's all done. The rear brakes are sorted as Caterham have done all that work for me as part of the De-Dion set up which is now complete. The front end will be built as a whole, so that's still to do. I've got a vague plan in my head for that, but that's all at this point. The shell's currently sat in the garage awaiting the completed workshop so I can set to again with making the engine and gearbox mounts.

The original plan was to build a replacement for my old MK Indy 7 clone kit car. I owned this when I was married and I loved it! 500kgs, 160 BHP and an 11,000 RPM rev limit due to having a Honda Blackbird engine makes for quite an intoxicating drive.
However, with a divorce to pay for and some outstanding debts to clear, I had to sell it. Which was a real shame as I loved having my little toy car. But now she's off in the Alps hopefully having a lot of fun. So the aim of making something at least as quick but more practical came about. More practical because owning a 7 is fun, and I've done a full weekly shop and even fetched 7' tree stakes in it but having a heater and a boot would be nice so I can go touring in it and maybe even persuade my partner to come along occasionally. But not often though. She tells me off too much for that......
So the search started for ideas. I didn't have any one thing in mind as I was open to just about any sort of project, but I was leaning very quickly towards something small and light as that's how I like my toy cars. It makes them cheaper to run and look after and parts tend to last longer. They're also a more engaging drive. And they fit in garages with space to work on them too!
One day I got a call from my partner saying a bloke at work had been told my his Mrs to get rid of the car he'd not really been working on for the past 4 years. Following a few questions, he didn't really know much about what the car was and he thought it might be an MG Midget. Since he only wanted £100 for the car and the boxes of bits, I figured it was worth a look. Upon closer inspection, it turned out the car was an 1969 Austin Healey Sprite, not a Midget, and it was complete but had seen better days. It also isn't registered in the UK as it's a left hand drive US market car. This also means it had spent most of it's life either in garages in the UK or in Florida where it's nice and dry. Whilst I hadn't planned on a full re-build, it seemed like a good challenge so £100 soon changed hands and the car was trailered home.
Upon closer inspection, and initial strip down, there was a bit more rust than I had hoped but less than I feared. Some fool had also tried to fit some form of arch extensions to the sills on both sides by brazing on steel plates and then covering them in 1/2" of filler! But overall the shell only needed what seemed easy work and a plan was hatched to change the engine and up the power.
From researching what can be done to these little cars, it soon became obvious that the engine of choice is Rover's K series engine. It's a lightweight, all alloy engine that is very light and comes in 1.4, 1.6, 1.8 and 1.8VVC versions ranging from 110 bhp up to 190 bhp for Lotus's VHPD version.
So off I went to Ebay, looking for a decent 1.8 VVC engine. I even bought one along with the better alloy inlet manifold and ECU. But then I had a thought. To beat the MK Indy, I wanted more than the 300 bhp/ton that it had. And in a 750 kgs car, that means having 225 bhp. Which as it turns out is quite a bit for a usable N/A K series. It's doable, but means spending quite a bit more money than I had in mind. So the K series got sold.
So a re-think was in order. I've always wanted, but never had a V engined car. So a bit more research dug up Mazda's KL 2.5L V6. It's tiny for a V6, all alloy and 160 bhp in stock form. But with the addition of individual throttle bodies, or ITBs, it'll make 205bhp, along with a good dollop of torque. It's also a nice revvy thing, with a factory limit of 7200 rpm which can be safely raised to 8,000 rpm. Now this was starting to look more like it. With a hike in compression, easily done with JDM spec pistons, and maybe some reground cams, a nice 225bhp should be achievable. OK, it's a bit bigger than the K series, but given all the work I had planned, what was a little bit more?!
Now, when taking a 40 year old car and quadrupling the power it has, there are a few other things you need to consider. Can the shell handle it? Will the brakes stand even a bit of a chance of stopping it? Will the tiny little back axle last for more than 30 secs? Is the front suspension any good? Is this a good idea, and has anyone else done it for hints and tips?
And for the Sprite, the answer is mostly no to those questions! The shell could cope, but I decided to reinforce it anyway in several places. The brakes? Not even worth considering. So it's MGB 10.75" discs with 4 pot Wilwood callipers at the front and 9" discs at the rear. The back axle? A standard A series can snap one, so the V6 would mash it in moments. A full De-Dion set up from the back of a Caterham Superlight should do the trick though. The front suspension? Dubious at best and needs greasing more than I want so it's going to be replaced with a double A arm coil over set up. It might have inboard coil overs to aid with packaging and ride height adjustments, but that's not for definite yet. As for it being a good idea, yes it is. No-one else I know of has done this to a Sprite before but I do know of one other chap fitting the same V6 as he's been asking me for advice. So at least one person thinks I know what I'm doing!!
So that's the plan, but where am I now? Well the shell's pretty much done. There's some minor work to do on the front suspension mountings and I have to re-build the transmission tunnel to fit the MX-5 gearbox I'm using but that's all done. The rear brakes are sorted as Caterham have done all that work for me as part of the De-Dion set up which is now complete. The front end will be built as a whole, so that's still to do. I've got a vague plan in my head for that, but that's all at this point. The shell's currently sat in the garage awaiting the completed workshop so I can set to again with making the engine and gearbox mounts.
Subscribe to:
Comments (Atom)